Maybe it’s your first time setting up a home studio. Or maybe you’ve had a few budget studios and now you want to upgrade and fix all the problems you’ve noticed. You’ve probably bought a few decent microphones, splurged on some really great headphones, and you’ve done all the technical work to get your DAW working the way you like it. Maybe you’ve even bought a great set of speakers but the sound isn’t exactly like what you’ve heard in a high-end studio.
If you want to get the same results as a professional studio, you’re going to have to do what the big studios do: Design your acoustical space.
In Part 1 of this article, we looked at the definitions of reverberation and absorption, which are two important considerations in a home studio setup.
Every high-end studio has the “A Room” — the biggest room with the best console and all the bells and whistles. They also have many B, C, and D rooms for smaller, lower-budget, and specialized needs. These rooms have also been acoustically designed to the same standards, so there’s no reason that we can’t emulate the design work and achieve much the same results in sound quality in our own home studio setup.
Create a Blueprint of the Studio
The first part of designing any studio is to examine the physical space. A good starting point is remove mobile things from the room and then to actually make a blueprint by measuring everything that’s built into the room: the walls, the doors, the windows, any closets or miscellaneous build-outs, the ventilation, etc.
Make sure to include all of these elements in your blueprint. This will help you make some smart decisions about what you can include in our studio and what isn’t going to fit in the room. It’s also going to help you do some acoustical shaping to the room.
Mixing Desk Placement
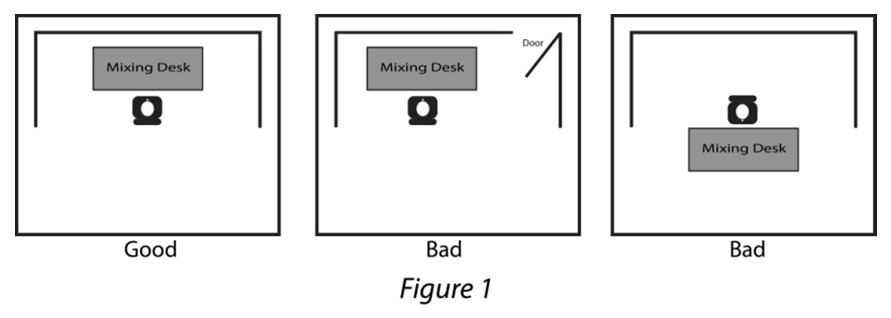
There is only one device that is absolutely necessary in our studio: the mixing desk or console. This should be specifically placed in the middle of the longest two walls, parallel to one wall with no doors or windows (see Figure 1).
When placing your DAW desk, try to position it in the middle of a flat wall with no doors or windows. You’re aiming for an even distribution of reverberation on the left and right sides for an even stereo sound.
Corners are not ideal, but in budget studios this may be unavoidable. In this case, put the desk at a 45-degree angle to the corner, and try to fill the void behind the desk with absorption material. (Leaving the open corner empty will artificially enhance your bass response.)
Depending on your needs, the desk can be very close to the wall or a few feet away, as long as it doesn’t touch the middle line of the room. Violating this design concept will require advanced acoustical treatment to get a balanced sound.
Every room has six sides, and you’ll need to consider all of them in your design. It’s best if no wall, ceiling, or floor is parallel to another — but of course, parallel surfaces is how all rooms are typically built.
As you design your room, consider how to break up parallel surfaces to minimize the reflections (the strongest part of the reverberation).
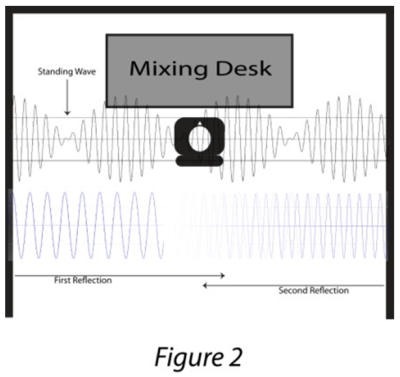
Reflections are one of the main causes of poor studio design, as they affect the stereo and/or surround sound image, they cause standing waves (see Figure 2), and they affect the frequency response. We solve these issues with deflection and absorption.
Speaker Placement
When setting up your audio studio, make sure there are no obstacles between your listening position and the speakers. They should be in front of all other surfaces, including your computer monitors, so you don’t cause any reflections or refractions before you hear them.
The speakers should be pointed directly at your ears, and they should be positioned as described by the manufacturer. If they’re designed to be upright, place them upright with the high frequency speaker (tweeter) at the same height as your ears. In most cases, the speakers need to be positioned at least 5 feet away from each other to achieve adequate stereo separation.
Avoid placing the speakers directly on your DAW desk, as this will artificially enhance the bass frequencies.
Take Inventory of Your Studio Gear
In your studio design, consider what gear you need to have in the room, such as video monitors, musical instruments, technical equipment, recording booths/systems, furniture, etc. Which of these things must be in the control room/studio and which of them can go in other rooms? Can we reallocate a closet, window, or air conditioning unit?
Each item that’s in the control room has its own needs, and these must be addressed too. Many of these items may also make noise that will need to be either removed, absorbed, or recorded.
Using Absorption to Control Reverb
In an audio studio, we use absorption to control the amount of reverb. We want a live studio, but at the same time, we don’t want the reverberation to overpower the actual sound source that originally started vibrating the air molecules.
We want to create a natural, standard, “baseline” amount of reverb that we can get used to so our sound is uniform in most playback environments. A good rule of thumb is to use only the amount of absorbing treatment you need and no more.
As reflections are typically the strongest part of the reverb, it’s a good idea to make sure the wall opposite the speakers is covered in a soft material. Professional studios use Sonex (the stuff people say looks like egg cartons), but any soft material — such as curtains, rugs, pillows, or blankets — can offer a budget-conscious solution.
Corners of rooms have a tendency to emphasize bass frequencies, so using absorbing material in the corners can be helpful, too.
Test Your Home Studio Setup
Make a few sine wave files at different frequencies and use your ears to see which ones seem louder. While the most important spot is where you sit when working, try listening from various positions and moving the absorbing material around your studio. Listen to some sounds and/or music you know really well to see how it changes.
At this stage, you need to learn to develop and trust your ears. Experiment. Make your studio sound good, and your sound will be good!
Final Tips
While you’re designing, it’s a good idea to consider the “non-acoustic” needs of your studio as well.
Electrical power sources are always an important consideration, as well as lighting, ergonomics and space utilization. Some things, such as ventilation, storage, usability, access, and a clean look may seem trivial at first, but if you’ve ever recorded in a really hot studio before, you’ll know that this can have a major impact on your ability to be productive.
Don’t neglect safety considerations, either: GFCI outlets, circuit breakers, and cable placement are not optional — they’re the rule!
It’s important to remember that we aren’t trying to design an acoustically dead space. Our goal is to control reverberation and remove any sound problems in our working environment. We’re emulating the environment where our audience will typically listen to the music we make. We want our control room to sound like real environments — all of which have some reverberant surfaces. Now we’re thinking like the professional, high-end studios!
Featured image by andrew pilling


Leave a Reply