In the video game industry, interactive music, also known as adaptive or dynamic music, is music that changes based on player interaction. If you want to learn how to compose video game music, developing your skills in the area of interactive music composition is a good place to start.
If you’ve done any amount of gaming in the last 30-odd years, you’ve already seen adaptive music in action: The player starts out in a happy elven village, but as he leaves the safety of his surroundings, the music undergoes an ominous shift in mood and it begins to rain and thunder. Progressing further, the player soon finds himself surrounded by ogres wielding axes and the heads of his elven buddies.
As composers of video game music, we need to succeed in conveying all of these varying emotions, much like film composers do when scoring to picture. However, games can be far more complex because we cannot determine if, when, or how long it will take the player to reach that next all-important musical cue.
With this in mind, we set out to compose in such a way that the music can “flow”, as if deliberately, from section to section, back and forth if need be, and hopefully without any glitches — this is how to compose video game music that makes clients happy.
Factors in Interactive Game Music
There are an infinite number of ways to create dynamic music in video games, and results will vary based on a number of factors:
Game Design: How linear is a game? How fast-paced is the game? How many options does the player have that will impact musical progression?
Audio Engine Limitations: Are we working with FMOD or Wwise (two leading audio tools in game development), or are we working with the barebones of an iOS game engine developed by a single programmer?
Composer’s Abilities: How experienced is the game composer and how does he or she intend to bring the game developer’s vision to life?
That said, regardless of what kind of equipment and experience you have at your disposal as a video game composer, succeeding at dynamic composition comes down to applying a few basic compositional strategies and organizational skills.
A Real-World Demo of Interactive Video Game Music
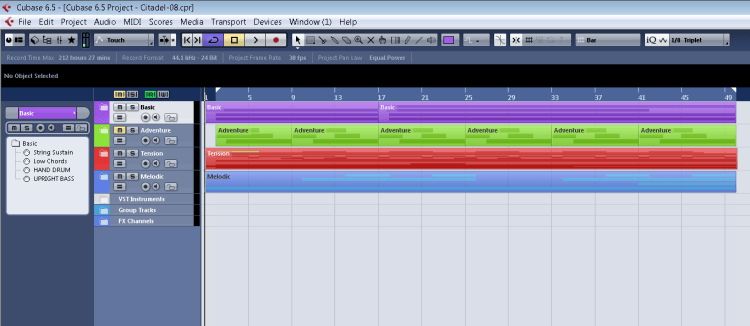
I’m going to run you through a very simple arrangement that I’ve organized into four stems (in this case, stems meaning segments of music that can be overlaid on top of each other and that sound harmonious together — effectively submixes for those engineer buffs out there).
This arrangement was created for a game title where the developer wanted the stems to crossfade in and out on a whim as the player frantically dashed about — while still sounding good. There were no third-party developer tools here, so it had to be simple enough so that the programmer could get these four stems in, have some muted, and adjust the levels dynamically as the player engaged in various actions onscreen.
First things first: Good organization will save the day when you’ve got 50 tracks in a project. Make sure you organize your projects in hierarchical fashion based on your personal preferences and music design and implementation strategy.
Composition Tip #1: Organize your stems and assign each stem a musical function corresponding to its role in the gameplay.
In this game title, I worked with four different stems that I rigidly titled: Basic, Adventure, Tension, and Melodic. All four stems can be played either solo or in combination with the other stems, and it’s important to note that they are exported at precisely the same length so that their loop points are the same. This makes it incredibly easy for implementation by the programmer.
I planned out the main function for each of the stems (besides the main Melodic stem) as follows:
Basic will serve as a musical pad to introduce atmosphere to the game. This will loop indefinitely, except when the player dies and the death jingle plays.
Adventure will be used to create a whimsical effect — it might consist of woodwind runs and a basic string melody. We might even introduce some light percussion elements here, such as a tambourine or cymbal swells. We could also have these as a separate stem and call it Adventure2.
Tension will feature all of the heavy drums, brass swells and rips, and everything loud and boisterous, strategically placed at the end of musical phrases from the other stems so as not to intrude and muddle everything up. I tend to have a solid beat in this track that features from start to finish.
The Tension track also sounds great on its own and features in parts of the game which are quite dark and far-removed from all the tranquility and familiarity of the Adventure and Basic stems.
It might also be a good idea to have a Tension2 track which features double-time hi-hats or cymbals, or even plucked strings to create a sense of urgency and rush.
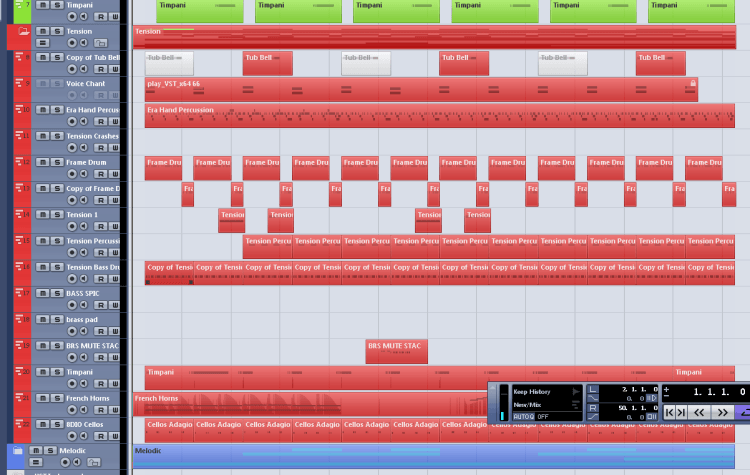
In this title, the Tension track was key. Notice how elaborate it is, with 15 MIDI tracks. I wanted to make sure the tension tracks would hold up nicely on their own so we could make the game even more dramatic by reducing the volume of the more melodic elements of the score.
A good general rule of thumb is to try to feature percussion on a separate stem (consisting of multiple tracks) as much as possible, as this is the easiest way to introduce tension into a score.
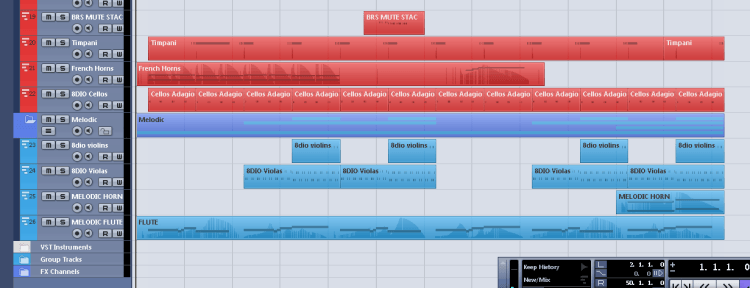
Melodic tended to be a single instrument, such as an oboe or a flute, which carried a long melody throughout the piece. You could have several Melodic tracks containing character themes that sound good when overlaying the basic track.
The Melodic stem wasn’t especially substantial throughout the entire score of this game. It was merely used to introduce a lead melody with solo instruments such as oboe, flute, and violin. In this example, I’ve used the viola and violin staccato samples in the Melodic stem to help accent the celli in the Tension stem above, while making sure that they still hold up by themselves if the Tension track is muted.
Composition Tip #2: Use the same instrument on different stems to create variations in mood and tension.
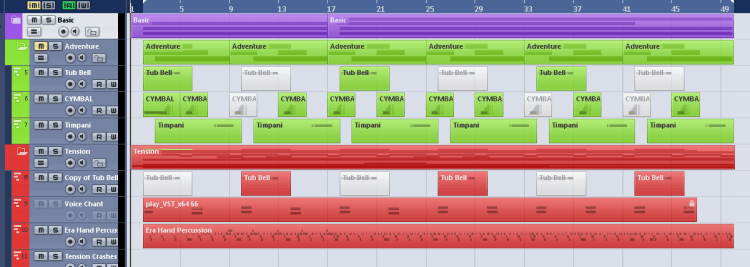
The screenshot above demonstrates a very simple example of how the same musical instrument can feature in different stems. This can be a good way to add drama or fill out the musical piece as the player progresses.
Here, I’ve created two MIDI tracks for the tubular bells. Both tracks point to the same sample library; however, when exported, only the appropriate folder will be soloed and the rest will be muted.
One really common use for this is to split up percussive grooves and fills; for example, you might have two frame drum tracks where one track is more primitive and only has a drum roll every other bar or so, while the other track has a drum pattern that’s consistent throughout the piece.
Each of these MIDI tracks would be exported as part of a different stem, so they can be played alone or together and there won’t be any nasty doubling-up effects because the frame drums would never play at the same time; however, depending on your preference, they could co-exist if both stems are played together, or they could just be sounded individually to create different tension levels in the game.
Composition Tip #3: Make room for the other sounds in the game.
It’s important to note that, even though all of the tracks worked well together because of each stem having “breathing space” to allow another stem to speak, it’s not always advisable to have all of the stems playing at once. As mentioned earlier, the Tension track sounded amazing on its own — it was incredibly dark and worked well for when the character was in trouble.
Often, less is more. With all of the sound effects going on in video games today, we need to make sure that these sounds have frequency space to be heard as well. By fading stems in and out, we are able to create many variations in the soundtrack and in what the user feels as a result, all from one piece of music being dynamically “mixed” on the fly by the player’s actions.
Composition Tip #4: Clean up your edges.
Hopefully you would have already thought about this before submitting your files, but, needless to say, it’s vital that you check the loop points of all of your stems to ensure that all of the files were exported at the same measure points in your sequencer and that there are no nasty clicks and pops from the loop point.
Final Words
I hope this tutorial has given you some ideas and inspiration that you can put to use when you create your next dynamic score. Having worked on a variety of formats, I find the above method to be the simplest way to implement dynamic music in a video game, especially for small indie productions where resources for sound code and implementation tend to be sparse.
This system is flexible and easy to follow, and it serves as a good template to convey a variety of emotions in a video game — not to mention that it can be expanded upon by adding more stem variations to fit the purpose of your game’s design. Now go make something!
Got any tips for creating adaptive game soundtracks? Share them with us in the comments!


Leave a Reply